Monday 29 October 2012

Going, going, gone

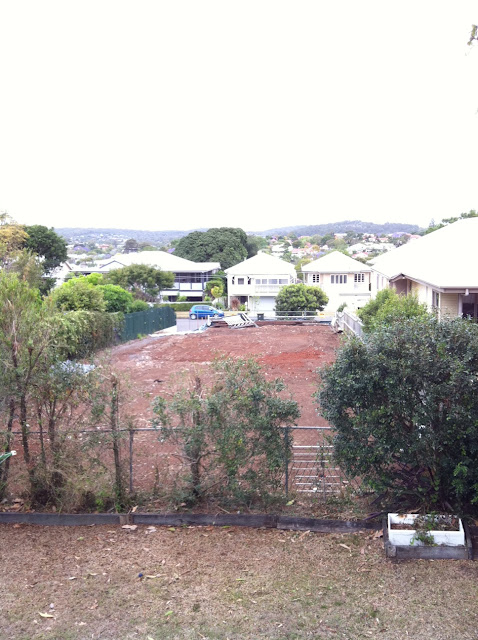
Well that house that sat behind the Sow's Ear is well and truly gone. It was burnt badly during a fire in May and last week it was progressively demolished. Here is a pictorial of its demise.

This photo was taken late 2010 when the house was still intact and when we had  overgrown bushes

The day after the fire in May 2012

The house being demolished last week

The house is demolished

A vacant block of land.
As you can see Jason was very severe with the pruning shears on our back fence line! Let's hope they grow back.

Sunday 28 October 2012

Busy weekend working on the Sow's Ear

There is always something to do on the Sow's Ear. That's just the nature of home maintenance and of looking after an older home.

With the windy overcast weather today, we decided to oil the timber of the side staircase that Mr D and Scotty built a few months ago. That was the final thing to be done on the staircase now that it has been completely painted. It will probably need a couple more coats as the timber just soaked up the decking oil like a sponge.

Newly oiled decking and treads on the exterior stairs

We also bought a few bags of black polished river stones to fill up a disused garden bed that is located near the rainwater tank where Jason built the new valance. This spot usually just fills up with leaves...we thought the stones would make this area look a little more loved.

black polished river stones. We bought the 30mm - 50mm size stones.
Jason's valance building is becoming more prolific and he started a new set of decorative valances under our bedroom. There's no stopping him...except for the fact that he ran out of timber!!


Another valance for under our bedroom  Work stopped after Jason used up all his timber  supplies.
We also did a very severe prune of our lilypilly bushes, I forgot to take a picture but I will show you in the next post to illustrate that pruning is not done half-heartedly around here!

Saturday 27 October 2012

Holy Valance: part 2

If at first you don't succeed try, try again.


After Jason's first attempt of the valance turned slightly pear shaped, he's made some adjustments and is much happier with the how this attempt has worked out. It's a more solid construction so it should stand the test of time.

Jason started another valance under our bedroom and will slowly progress work around under the deck. It should look very nice when it's done.

Tuesday 23 October 2012

What's been happening?

We had a fantastic long weekend away camping at beautiful Brunswick Heads in Northern New South Wales. It was so nice to get away from the general rigmarole of the Sow's Ear...although we still had to pitch a tent...and Jason was still wielding a hammer...

Brunswick River.
Image stolen from Madame McGreevy

Sons #1, 2, 3 in soft focus, playing on the beach

When we returned, we came back to this view from our back deck. The old house at the back of the Sow's Ear which had burnt down in May (read here) is finally being demolished. We received a letter in the mail telling us that the house was being demolished and removed this week. So sad.


In the letter it contained an image of the house as it was originally. It looks like a war service home - they were built for returned soldiers after World War 2...but I could be wrong. If only the image was bigger, you'd be able to clearly see the back gable of the Sow's Ear which pre-dates this house by 20 years or so.


So, I wonder what will be built in its place? A prize to the person who guesses correctly...you'll just have to wait a while to find out who is the winner.

Tuesday 16 October 2012

Holy Valance!

It's been crazy scary around here this afternoon. Jason's been working like a man possessed trying to fix up a  little fubar on the newly erected valance he finished on Sunday.  Here's the story...

Jason took the day off to escort Son #3 on his Kindergarten excursion to a farm. After dropping off the two eldest boys at school, we were motoring along to the Kindy, chatting and talking about the old Queenslander houses which dot the route. I'm driving, Jason gazes thoughtfully out of the passenger window while Son # 3 exclaims how he's going to milk a sheep (city boy).

"Look at the valance," said Jason casually, "I don't really like how they've angled it that way. It's not as good as ours."

"I don't mind an angle but, yes dear, your arched valance is a work of art," I replied, noticing Jason's chest expanding with pride.

"And I don't like how they've left a big gap between the weatherboards and the start of the valance," critiqued Jason pointing to an old Queenslander we were driving past.

"You know, they have to do that. It's so the termites can't eat through the main part of the house. It would compromise the ant capping on the house stumps. See how all the houses along here have that gap between the weatherboards and the valance battens," I said. Expertly.

Jason was silent.

"You left a gap on ours, didn't you?" I enquired.

I turned to look at an ashen-faced Jason.

'No I didn't. Of course I didn't leave a bloody gap. I've butted the valance right up against the house. Holy f@%k! That's all I bloody need," he exhaled.

"Oh!"

Which brings us to this afternoon, a crow bar and a sledge hammer were wielded with genuine fury. Some choice words were aired.

Jason showed no mercy. If only he had ripped off his shirt, I would've filmed it for the fans.
New supports which Jason spent this afternoon building. It will allow Jason to put on cross beams on which the timber battens will be nailed. It will also not compromise the ant capping which (you can see the corner of it at the top of the concrete post) prevents termites chomping through our timber house.

Jason's workshop in the fading light. From what I can gather termites will travel along concrete stumps but the ant capping stops them from getting to the timber. The timber valance Jason built previously would have been an access point to the weatherboard house. Best to fix it now before it becomes a problem.

Jason's had to dismantle the whole thing and start building the valance from scratch again. He is so angry at himself for making such a rookie mistake...he also hates the fact that he wasted a lot of precious time.

I said he shouldn't be so hard on himself. Live and learn, I say.

Sunday 14 October 2012

Valances on a Queenslander house

We are all about the decorative bling here at the Sow's Ear.

Today, Jason spent most of the morning erecting the decorative valances (or skirt battens) which are found between the stumps of a traditional Queenslander where the weatherboards end.

A valance is mostly a decorative device from what I can gather - a supporting frame is affixed between the stumps and simple timber palings are nailed onto the support. The paling are then cut in an arched, angled or straight line pattern with a jigsaw

Anyway, Jason is mad for them. Mad I tell you. He is planning on building more, so it dresses up the Sow's Ear. Here is a shot of his first foray into valance territory:

New valance.
Jason plans to get the belt sander onto the ends to smooth it out.
Over the next little while, Jason will install another valance on the other side of the Sow's Ear, under our bedroom.

This is the little area which will get a mini-valance, around the house stumps

Afterwards, with some practice under his belt, he wants to tackle the huge area under the deck. It is quite plain and bare, but the addition of the valance will soften the deck, allowing it to tie in nicely with the character of the house.

This is an old photo of our deck when we were painting last year. Jason will build an arched valance between the deck posts below the deck floor. It should help to disguise the proportions of the deck
Building the valances will be handy weekend DIY warrior work and will have a massive impact on how this little old Sow's Ear presents itself.

It's good to have a project!

Wednesday 10 October 2012

Rubble

The worst thing about renovating is the amount of building detritus that one accumulates in one's backyard.

The last exterior project managed to produce a large pile of old fired bricks and some square concrete pavers which we no longer needed. Fortunately our rubbish happened to be someone's treasure, with Mr D, our thrifty builder, taking the lot off our hands to use in his own landscaping endeavours.

On the weekend Jason and Mr D made a huge dint in clearing the yard.

Mr Hi-Vis and Mr D loading up the ute.

A few weeks ago, we also bit the bullet and got rid of some old brickies trestles which Mr Rooney, our original builder, could not take with him when he moved south. I whacked them on Gumtree which is a free online classified site and cheekily tagged them as Vintage Industrial trestles. They must've been about 80 years old, so the description did contain a grain of truth...

rusty steel brickies trestles
Everyone we knew said we should just dump them, saying we'd have to pay someone to cart them  to the dump.

Anyway, someone paid $40 for the two (he wanted a cheap pair of trestles to paint his house). Our yard was instantly less building-site like when they were whisked away!


It was like saying goodbye to our babies. They were so useful when Jason was painting the Sow's Ear.

Monday 8 October 2012

Weekend activity

What a jam-packed weekend we had at the Sow's Ear!

From attending a very glamorous wedding...

Beautiful St Mary's in Kangaroo Point

Our dear friends L and J outside the church
The most exquisite menu at Restaurant II. Delicious!

where I drank so much I thought I could dance really really well...fortunately I didn't drunk Instagram those images...

To hosting a dinner for Jason and his work mates the very next night...while nursing a major hangover...

I baked this ham using a maple honey glaze. It was quite an easy glaze and tasted good.

to celebrating Jason's birthday somewhat more quietly...

Lemon Coconut cake makes a tasty birthday cake

A miniature Peugeot was a gift from Jason's parents...hoping it will be more reliable than the big one...


Thursday 4 October 2012

Boys’ room: details


Sponsored by Nuffnang

As you saw in the previous post, the boys’ room is finally done. Thank you so much for all the lovely comments. We are all finding an excuse to hang ‘round in the room to enjoy the newly renovated surrounds. The abomination that was previously their room… is now one of the nicest spaces in the Sow’s Ear.

And it couldn’t have happened without the vouchers Masters Home Improvements generously threw our way. There is no way we would’ve been able to complete the room this year given all the other work we’ve undertaken around here. Thank you Masters.

We are so pleased to have the room renovated and the boys are thrilled to have a bedroom to be proud of. This post will give you the details of some of the items we used to decorate the room (all the hyperlinks will take you to the Masters products we used).

Renovated boy's bedroom in a Queenslander house. 
We wanted a  cleaner more minimal look for this space using a white on white colour scheme for the walls, windows and ceiling.

The room was sanded to remove the very worst of the flaky paint. Jason replaced the window architraves so that they were consistent to the other rooms and he also removed the picture rail which was not original to the house. We replaced all the damaged window fittings too. He bought some reliable new safety goggles for the deconstruction phase, but I think he just wanted to complement his hi-vis uniform.

Beautiful ceiling rose has come up nicely. Vintage Danish glass pendant was purchased second-hand 
We spent a hefty portion of the room budget on paint and painting accessories which we purchased in-store at Masters. The room is painted in our signature Dulux Acrylic Wash n Wear Vivid i.e. straight outta the tin. It works for us and makes a great palette for a crisp looking interior - one coat of undercoat and two top coats on all the walls, doors and windows. 

Freshly painted white walls are a perfect match with framed art work
We framed some vintage Cuban movie posters we had using the Masters white timber picture frames. The frames come with a mat board already to go, making them an easy and cheerful option to display prints and photos.

One of the main problems with the room was the lack of hanging and shelf space. We would trip over school and library bags which were strewn across the doorway. Now the bags have a handy place to reside on a port rack near the door. We bought the black contemporary satin hook board to keep their bags off the floor. No excuses for bags to be anywhere else now!

The boys have a place to hang their bags when they enter the room
Some stylish floating shelves to display their treasures. Attractive baskets make for good sneaky toy storage under their beds.

For some reason, we have a penchant for floating shelves. We installed two for the boys to display their collected items, as they are into figurines and models. It is also handy for their books. 

Another big change we instituted was a brutal cull of the boys’ toys in their room. We’ve rationed them to a couple of square storage baskets for their special things. It’s attractive storage for under the bed. Their bigger toys are under the house now.

The boys have been using the room for nearly two weeks and so far they are keeping it tidy. Hooray! (It might be a different story when they are back at school and kindy though...!)

Gloss white doors make the built-in cupboards disappear in the room. 
The built-in cupboards were also repainted. From brown to white, it looks like a completely different room. Adding new door knobs improved the overall look too.


I also bought some new coat hangers for their built-in cupboards. They store all their shoes in the cupboards, as they already had shoe racks. A cull of their clothes and shoes occurred while we were renovating the room too.

Sleek door knobs bring a new edge to the doors. These knobs are my favourite and are similar to the Arne Jacobsen designed Vola knobs.

The architectural glass and decorative architraves need only the simplest of window treatments. The blinds are always up during the day.
We don’t have any window coverings in the Sow’s Ear but we thought it would be prudent to get some block-outs for this bedroom and the early rising occupants. The boys’ bedroom gets the morning sun! The white Roomaker Oscar roller blinds were by far my favourite, discreet and unobtrusive for the lovely coloured windows.

Neutral rug adds warmth to an all white room. It will also match any bedding we may end up choosing down the track.
I liked the range of affordable wool rugs Masters had online and thought it would be a good way to give warmth to the room. The rugs must be popular as most of them were sold out when I went to order it. The Jora rug comes in a fairly neutral tone blending well into whole scheme. A nice vibrant green rubbish bin is a practical way to inject some colour into the all white room.

Most of the decorator items were chosen and paid for online, which I then organised to pick up at the Masters Tingalpa store when it was ready. This was such a convenient way to organise a bulk purchase, as it meant that I could be in an out of the store when I had Son#3 with me. Quick and easy. And friendly!

Obviously we didn’t purchase every single thing from Masters to renovate the room, but we did try to use as much as possible to get bang for our buck. We had a lot of the timber and brass window hardware already and we made use of a lot of the furniture and soft furnishing items we had in other parts of the Sow’s Ear.(I love using the old Italian military blankets on their beds, with crisp white sheets and their favourite cushions. The blankets are also something they can keep when they are older.)

With vintage pieces, op-shop finds and Masters Home Improvement purchases, I think we’ve made a fairly attractive room which the boys just love.

And compared to the before and during pictures , it’s come a long way, Baby!


P.S
The winnner of our Masters $500 voucher giveaway JenJen QLD is planning to spruce up her home after it had been rented out when they were overseas. She said there was a bit of damage from the tenants, so the vouchers will be put to good use.

She is currently negotiating with her family the following options on which to splurge: a fancy chicken coop which the kids are vying for, a new rug or light fitting or some safety glass fence panels for the pool. So much to choose from!

Wednesday 3 October 2012

Boys' bedroom: before and after photos

I was planning on publishing a big long blog post about redoing the boy's bedroom today...but instead I'm just going to show you a big long pictorial of the room. You'll be able to read all the details in the next blog post.

What we have is a bedroom that our two youngest boys can share for the next few years until we build in some rooms underneath the house. Son #2 is seven years old, while Son #3 is four and they are little rascals!

This room would have originally been the Sow's Ear's master bedroom, given it is such a generous size. We are able to comfortably fit two king single beds into the room and it has good clothes storage in the built-in cupboards that were here when we moved in.

I hope you'll enjoy the little tour of the room's evolution.

So here are the afters:

Renovated boy's bedroom in a Queenslander house


Repainting the ceiling has freshened up this room no end. Vintage Danish glass pendant was purchased second-hand 

Freshly painted white walls are a perfect match with framed vintage Cuban movie art

The boys have a place to hang their bags when they enter the room
New shelves and if you squint you'll see Obi-wan riding a horse. They have a collection of Simba knights and horses. There is also a sprinkling of their own artworks.

Gloss white doors make the built-in cupboards disappear in the room. 

The architectural glass and decorative architraves need only the simplest of window treatments. 


Vintage Anna Castelli  Ferrieri componobili cabinet which used to be in Son#1's room. We swapped furniture. Neutral rug adds warmth to an all white room.
Now these images are the befores. (As in the year that we moved to the Sow's Ear in 2009)

This is the bedroom when we moved in. You'll note the cot and change table. This room has evolved from a toddler/baby room to two growing boys sharing a room.

Brown louvre doors. What can I say?

The young occupants back in 2009!

These shots are the during and how the room looked just before we renovated!
Flaky paint work. The 80+ years of paint layers which we added to.
deconstruction phase

sanding and scraping phase
Some gratuitous shirtless Jason shots. For the fans! Don't thank me.

This is a before shot of the room when it was tidy (which was practically never!) in 2010.  Mouldy ceilings and tired colour scheme.

The room as it was a month ago. A great big mess!

So, what do you think?

If you want to find out the details of how we transformed the room, tune in for the next blog post!

Related Posts with Thumbnails